“悉灵杯”课题研究-集成RGB_D相机SDK的Open3d点云功能UI项目开发(项目demo)
前文:
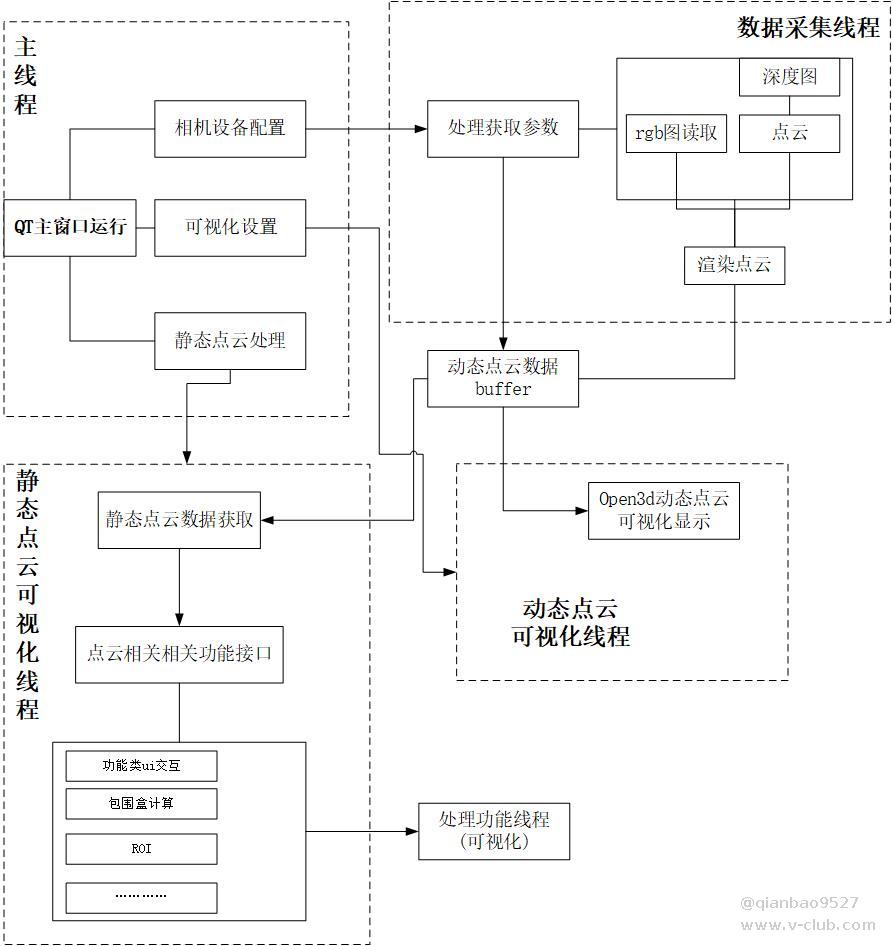
整体项目demo框架如下:
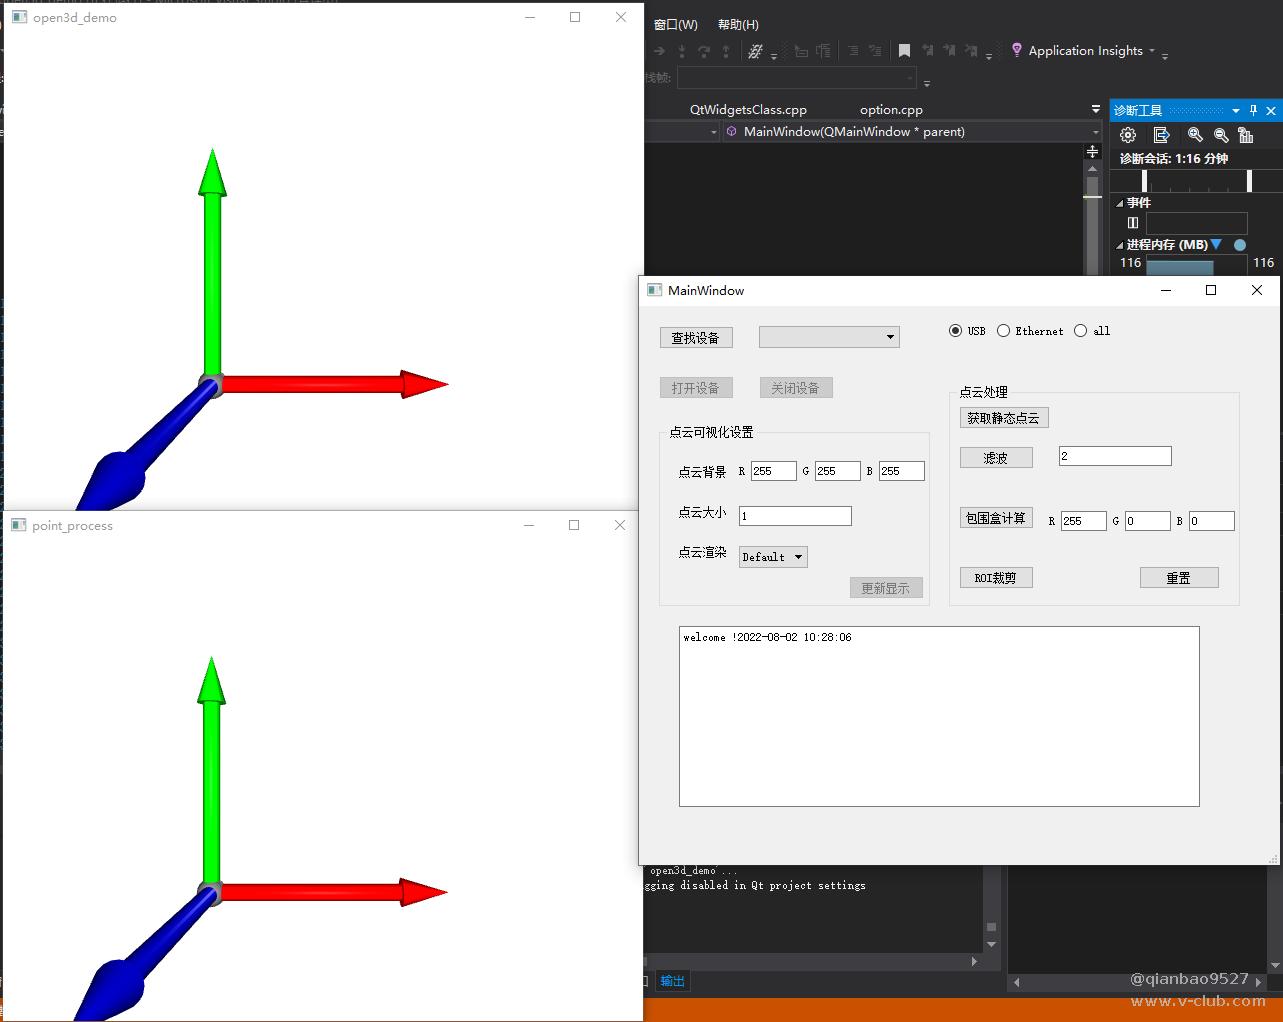
demo UI界面如图所示:

主要包含:
1.功能选择界面:包含设备连接设置、点云可视化设置模块、点云处理模块
2.动态点云窗口 open3d_demo
3.静态点云处理窗口
一.相机SDK获取RGB数据并显示RGB点云
对于不同版本相机,其默认图像输出格式不同,常见的是YUV格式,而RGB点云与RGB图所需的R\G\B参数需要进行转换。RGB_D相机的yuv422图像格式存储方式:Y1-U-Y2-V,一共4个字节(32bits),即两个像素点共用U,V参数。此外常见的还有RGB8-plannar格式,其存储方式为所有像素点的R先存储,后续存储G,最后存储所有的B;
两种格式的图像读取读取代码如下:
bool depth_to_points::YUV_to_RGB_colorpoints(MV3D_RGBD_IMAGE_DATA * image_data, shared_ptr<geometry::PointCloud> pointcloud)
{
if (image_data->enImageType == ImageType_YUV422)
{
//YUV转RGB
unsigned char*pdata = (unsigned char*)image_data->pData;
int step = 4 * sizeof(unsigned char);
int sum = image_data->nDataLen / step;
pointcloud->colors_.resize(sum * 2);
int y1, y2, u, v;
for (int i = 0; i < sum; ++i)
{
y1 = ((unsigned int)*(pdata + 4 * i));
u = ((unsigned int)*(pdata + 4 * i + 1));
y2 = ((unsigned int)*(pdata + 4 * i + 2));
v = ((unsigned int)*(pdata + 4 * i + 3));
//获取到单点的Y,U,V后,使用转换公式;
pointcloud->colors_[2 * i] = yuv422_to_rgb(y1, u, v);
pointcloud->colors_[2 * i + 1] = yuv422_to_rgb(y2, u, v);
}
}
else if (image_data->enImageType == ImageType_RGB8_Planar)
{
//读取RGB8
unsigned char*pdata = (unsigned char*)image_data->pData;;
int step = 3 * sizeof(unsigned char);
int sum = image_data->nDataLen / step;
pointcloud->colors_.resize(sum);
for (int i = 0; i < sum; ++i)
{
pointcloud->colors_[i] = { double((unsigned int)*(pdata + i)) / 255.f,double((unsigned int)*(pdata + i + sum)) / 255.f,double((unsigned int)*(pdata + i + 2 * sum)) / 255.f };
}
}
else
return false;

return true;
}
YUV转换rgb,yuv422_to_rgb函数其代码如下(感谢@王涛 给予技术理论支持):
Eigen::Vector3d yuv422_to_rgb(int y, int u, int v)
{
double r, g, b;
r =y+ ((360 * (v - 128)) >> 8);
g = y- (((88 * (u - 128) + 184 * (v - 128))) >> 8);
b = y + ((455 * (u - 128)) >> 8);
r = (y + (u - 128)*1.375);
g = y - (u - 128)*0.34375 - (v - 128)*0.703125;
b = y + (v - 128)*1.734375;
if (r > 255)
r = 255;
else if (r < 0)
r = 0;
if (g > 255)
g = 255;
else if (g < 0)
g = 0;
if (b > 255)
b = 255;
else if (b < 0)
b = 0;
return { r,g,b };
}
点云的RGB渲染在作者上一篇已经介绍过,通过color_数组来设置点的原色;功能函数代码如下:
流程简介:判断是否需要RGB渲染------(是:读取RGB图像)------ 动态容器读取点云数据。
bool depth_to_points::MV3D_TO_OPEN3D(MV3D_OPEN3D_DATA* points_open3d, MV3D_RGBD_IMAGE_DATA* image_data, bool color_refush, MV3D_RGBD_IMAGE_DATA* image_color)
{
if (image_data->enImageType != ImageType_PointCloud)
return false;
if (color_refush)//需要颜色更新
{
if (image_color == nullptr)
return false;
//读取颜色;
if (!YUV_to_RGB_colorpoints(image_color, points_open3d->pointcloud))//已经获取color
return false;
//动态内存读取点云
int step = 3 * sizeof(float);
int sum = image_data->nDataLen / step;
float* p_data = (float*)image_data->pData;
int j = 0;
for (int i = 0; i < sum; ++i)
{
float* add = p_data + i * 3;
if (*(add + 2) > 6000 || *(add + 2) < 20)
continue;
Eigen::Vector3d pp(*(add)*-1, *(add + 1)*-1, *(add + 2));
points_open3d->pointcloud->points_[j] = pp;
points_open3d->pointcloud->colors_[j] = points_open3d->pointcloud->colors_[i];
++j;
}
points_open3d->pointcloud->points_.resize(j);
points_open3d->pointcloud->colors_.resize(j);
return true;
}
//动态内存
int step = 3 * sizeof(float);
int sum = image_data->nDataLen / step;
if (sum == 0)
return false;
float* p_data = (float*)image_data->pData;

if (sum != points_open3d->pointcloud->points_.size())
points_open3d->pointcloud->points_.resize(sum);
int j = 0;
for (int i = 0; i < sum; ++i)
{
float* add = p_data + i * 3;
if (*(add + 2) > 6000 || *(add + 2) < 20)//滤去无效点
continue;
Eigen::Vector3d pp(*(add)*-1, *(add + 1)*-1, *(add + 2));
points_open3d->pointcloud->points_[j] = pp;
++j;
}
points_open3d->pointcloud->points_.resize(j);
return true;
}
优化:利用vector容器resize函数,减少内存开辟和销毁。
二、可视化与数据读取、处理多线程实现
上一篇中,作者简单介绍了一下双线程读取点云实现demo,这节将稍微详细介绍实现方式。
线程同步与安全是并发编程的关键问题,最容易发生的问题就是线程之间的访问冲突,故需要对线程之间共享数据进行加锁等线程同步措施,
需要同步的数据,以及对应的线程:
1.OPEN3D的窗口创建函数 CreateVisualizerWindow()是静态方法,需要保证线程安全,即只能有一个线程进行窗口创建。---->所有可视化线程
2.可视化参数(渲染方式、数据等)。---->可视化线程与主线程
3.点云数据buffer。---->可视化线程、数据采集线程、主线程(设备)
4.相机设备参数。---->数据采集线程、主线程(QT窗口线程槽函数读取设备信息)
由于UI项目实现方面,代码较为复杂,本节只展示动态点云可视化与点云数据处理线程同步:
主要使用了互斥锁、信号量两种方式实现同步:
C++内部没有提供信号量,根据信号量特性以及提供的条件变量,自定义信号量,代码如下:
//可视化通知点云读取信号
Semaphore my_sm;
/*##信号量
class Semaphore
{
public:
Semaphore(long count = 0) : count(count) {}
//V操作,唤醒
void signal();

//P操作,阻塞
void wait();


private:
mutex mt;
condition_variable cond;
long
##*/
//锁可视化参数 锁对象:color_set为共享的可视化参数对象、CreateVisualizerWindow静态方法
mutex mtx_color_option;
//锁点云数据 锁对象 :下面代码中的pointcloud指针指向的点云,属于sol所指向depth_to_points类型的对象
mutex mtx_pdata;
//锁相机读取参数 锁对象:points_get为共享的(设备参数、RGB读取信号)等相机读取设置参数对象
mutex mtx_read_points;
//锁可视化数据更新信号 锁对象:update,点云成功读取后,更新可视化中的点云几何体
//注意,如果没有这个判断,在点云读取失败后,窗口会卡死
mutex mtx_updata;
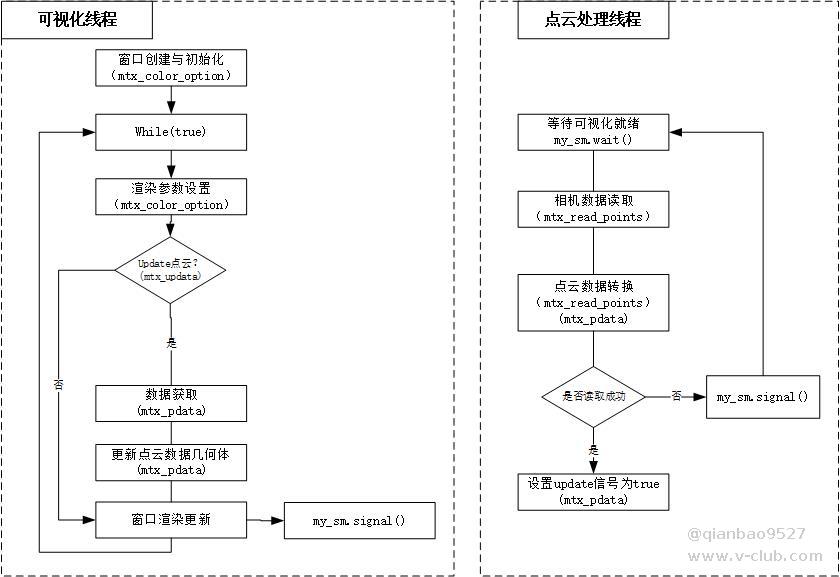
代码中,线程工作流程如下图所示:
双线程实现点云动态更新代码如下:
//可视化
void visual_open3d(shared_ptr<geometry::PointCloud> pointcloud)
{
visualization::Visualizer visualizer;
auto mesh = open3d::geometry::TriangleMesh::CreateCoordinateFrame(50);//坐标系框架
mtx_color_option.lock();
visualizer.CreateVisualizerWindow("open3d_demo", 640, 480, 50, 50, true);
visualizer.GetRenderOption().point_size_ =color_set.point_size;
visualizer.GetRenderOption().background_color_ = color_set.background_color;
visualizer.GetRenderOption().point_color_option_ = color_set.color_option;
mtx_color_option.unlock();
visualizer.GetRenderOption().show_coordinate_frame_ = true;
visualizer.AddGeometry(mesh);
visualizer.UpdateGeometry();
visualizer.PollEvents();
visualizer.UpdateRender();
//加一个条件变量来提示更新窗口
bool flag = true;
//渲染这方准备就绪通知读数据
my_sm.signal();
while (true)
{
mtx_color_option.lock();
if (color_set.refush_veiw)
{
color_set.refush_veiw = false;
visualizer.GetRenderOption().point_size_ = color_set.point_size;
visualizer.GetRenderOption().background_color_ = color_set.background_color;
visualizer.GetRenderOption().point_color_option_ = color_set.color_option;
}
mtx_updata.lock();
if (updata==false)//是否更新点云显示信号
{
mtx_color_option.unlock();
mtx_updata.unlock();
visualizer.PollEvents();
visualizer.UpdateRender();
continue;
}
else
{
updata = false;
}
mtx_updata.unlock();
mtx_color_option.unlock();
mtx_pdata.lock();//锁住数据
if (flag)
{
visualizer.AddGeometry(pointcloud);
int a = 0;
flag = false;
}
visualizer.UpdateGeometry();
mtx_pdata.unlock();
my_sm.signal();//信号量+1
visualizer.PollEvents();
visualizer.UpdateRender();
}
visualizer.DestroyVisualizerWindow();
}
//点云数据读取
void refush_buffer(depth_to_points * sol)
{
bool bExit_Main = false;

MV3D_RGBD_FRAME_DATA stFrameData = { 0 };
while (!bExit_Main)
{
mtx_read_points.lock();
if (!points_get.canread||points_get.handle==nullptr)
{
//设备不可读时,不更新buffer;
mtx_read_points.unlock();
int i = 100;//等一会,防止频繁拿锁和解锁
while (i--) {};
continue;
}
my_sm.wait();//等待渲染线程完成初始化或几何数据更新
// 获取图像数据
int nRet = MV3D_RGBD_FetchFrame(points_get.handle, &stFrameData, 5000);
if (MV3D_RGBD_OK == nRet)
{
MV3D_RGBD_IMAGE_DATA stPointCloudImage;
int yuv_image = 0;
for (int i = 0; i < stFrameData.nImageCount; i++)
{
if (ImageType_YUV422 == stFrameData.stImageData[i].enImageType|| ImageType_RGB8_Planar== stFrameData.stImageData[i].enImageType)
{
//读取方式,ImageType_YUV422/ImageType_RGB8_Planar
yuv_image = i;
}
if (ImageType_Depth == stFrameData.stImageData[i].enImageType)
{

nRet = MV3D_RGBD_MapDepthToPointCloud(points_get.handle, &stFrameData.stImageData[i], &stPointCloudImage);
if (MV3D_RGBD_OK != nRet)
{
break;
}
}
}

mtx_pdata.lock();
if (!sol->refush_point(&stPointCloudImage, points_get.refush_color, &stFrameData.stImageData[yuv_image]))
{
//读取失败,即解锁,再读取数据,不触发数据可视化更新
mtx_pdata.unlock();
mtx_read_points.unlock();
my_sm.signal();// 跳过渲染更新点云,再去读
continue;
};
mtx_pdata.unlock();
}
mtx_updata.lock();
updata = true;//更新可视化点云几何体信号设置。
mtx_updata.unlock();
mtx_read_points.unlock();
}
}
三、open3d静态点云处理线程
open3d最新版本0.15提供了许多接口,有兴趣的同学可以去open3d的girhub开源代码自行查看;作者使用的是0.10版本,主要尝试了包围盒、体素滤波、ROI裁剪功能并封装到项目中。
需要注意的是,静态点云可视化线程与静态点云处理线程有需要共享的静态点云数据,也需要加入锁来保证线程安全。
本项目中主要共享数据为:静态点云数据与参数(mtx_points_process),读取动态点云数据(mtx_pdata)
为了方便接口调用,使用func函数,设置如下:
static std::unordered_map<int, std::function<bool(const vector<double>&pra,shared_ptr<open3d::geometry::PointCloud>)>> points_process_func
{
{1,cmp_BoundingBox},
{2,ROI_points},
{4,voxel_filter},
};
points_pro为静态点云数据。
其结构体如下:
struct point_pro {
bool can_process=false;//静态点云更新信号
vector<bool>refush_p = vector<bool>(11,false);//点云处理功能线程更新显示信号
//操作参数保存
int choose = 0; //点云处理选择
vector<double>pra=vector<double>(4,1.f);//静态点云点云参数
shared_ptr<open3d::geometry::PointCloud>points = make_shared<open3d::geometry::PointCloud>();//静态点云存储
};
静态点云可视化线程代码如下:
void point_process(depth_to_points * sol)
{
visualization::Visualizer visualizer2;
auto mesh = open3d::geometry::TriangleMesh::CreateCoordinateFrame(50);//坐标系框架
mtx_color_option.lock();
visualizer2.CreateVisualizerWindow("point_process", 640, 480, 200, 200, true);//注意该函数应该调用了某个静态对象方法,需要线程同步
visualizer2.GetRenderOption().point_size_ = color_set.point_size;//渲染设置通用
visualizer2.GetRenderOption().background_color_ = color_set.background_color;
visualizer2.GetRenderOption().point_color_option_ = color_set.color_option;
mtx_color_option.unlock();
visualizer2.GetRenderOption().show_coordinate_frame_ = true;
visualizer2.AddGeometry(mesh);
visualizer2.UpdateGeometry();
visualizer2.PollEvents();
visualizer2.UpdateRender();
//加一个条件变量来提示更新窗口
bool flag = true;
//限制点云处理功能窗口数
unordered_set<int>choose_single;
choose_single.insert(0);
while (true)//程序结束后自动回收
{
mtx_points_process.lock();
if (points_pro.can_process)
{

points_pro.can_process = false;
mtx_pdata.lock();//锁住所有点云处理需要的接口、数据
refush_process_points(points_pro.points, sol->get_pointcloud());//更新静态点云数据
mtx_pdata.unlock();
if (flag&&points_pro.points)
{
visualizer2.AddGeometry(points_pro.points); flag = false;
}


}
if (points_process_func.find(points_pro.choose) != points_process_func.end())
{
if (choose_single.count(points_pro.choose) < 1 && points_pro.points&&points_pro.points->points_.size())
{
if(points_pro.choose!=2)//ROI裁剪不能更新数据,故裁剪已经更新数据时,需要再开窗口
choose_single.insert(points_pro.choose);
points_pro.refush_p[points_pro.choose] = true;
mtx_points_process.unlock();
thread px(p_process,points_pro.choose, points_pro.pra);
px.detach();
mtx_points_process.lock();
}
else
{
points_pro.refush_p[points_pro.choose] = true;
}
points_pro.choose = 0;//设置为不显示
}
mtx_points_process.unlock();
visualizer2.UpdateGeometry();
visualizer2.PollEvents();
visualizer2.UpdateRender();


}
}
```

为了方便接口调用,使用func函数,设置如下:

```c++
static std::unordered_map<int, std::function<bool(const vector<double>&pra,shared_ptr<open3d::geometry::PointCloud>)>> points_process_func
{
{1,cmp_BoundingBox},
{2,ROI_points},
{4,voxel_filter},
};
包围盒功能窗口实现线程:
pointcloud->GetAxisAlignedBoundingBox()可以获取包围盒几何体对象的指针box,通过后续更新指针box即可。该点云处理线程与静态点云可视化线程共享数据。
bool cmp_BoundingBox( const vector<double>&pra,shared_ptr<open3d::geometry::PointCloud>pointcloud )
{
mtx_points_process.lock();
pointcloud = points_pro.points;
open3d::geometry::AxisAlignedBoundingBox box1 = pointcloud->GetAxisAlignedBoundingBox();
shared_ptr<open3d::geometry::AxisAlignedBoundingBox> box = make_shared<open3d::geometry::AxisAlignedBoundingBox>(pointcloud->GetAxisAlignedBoundingBox());
box->color_ = { pra[0],pra[1],pra[2] };

open3d::visualization::Visualizer visualizer;
mtx_color_option.lock();//该函数调用静态对象,线程不安全,加锁
visualizer.CreateVisualizerWindow("BoundingBox", 640, 480, 50, 50, true);
mtx_color_option.unlock();//该函数调用静态对象,线程不安全
visualizer.GetRenderOption().point_size_ = 1;
visualizer.GetRenderOption().background_color_ = Eigen::Vector3d(1, 1, 1);
visualizer.GetRenderOption().show_coordinate_frame_ = true;
visualizer.AddGeometry(box);
visualizer.AddGeometry({ pointcloud });
visualizer.UpdateGeometry();
mtx_points_process.unlock();
visualizer.PollEvents();
visualizer.UpdateRender();
while (true)
{
mtx_points_process.lock();
if (points_pro.refush_p[1])//等待更新
{
points_pro.refush_p[1] = false;
mtx_points_process.unlock();
*box = pointcloud->GetAxisAlignedBoundingBox();
box->color_ = { pra[0],pra[1],pra[2] };
visualizer.UpdateGeometry();//更新点云\包围盒

}
mtx_points_process.unlock();
visualizer.PollEvents();
visualizer.UpdateRender();
}
visualizer.DestroyVisualizerWindow();
return true;
}
ROI裁剪点云线程:
VisualizerWithEditing窗口是OPEN3D专门设置的交互接口,目前只支持点云、网格模式的几何体,其它类型的对象是不允许添加的。为了防止线程冲突,该线程的点云数据在本线程单独开辟内存,并在初始时拷贝现有静态点云。
bool ROI_points(const vector<double>&pra, shared_ptr<open3d::geometry::PointCloud>pointcloud )
{
open3d::visualization::VisualizerWithEditing visualizer;//VisualizerWithEditing禁止添加除点云、个别线以外的geometry;
mtx_color_option.lock();//该函数调用静态对象,线程不安全,加锁
visualizer.CreateVisualizerWindow("open3d_ROI_points", 640, 480, 50, 50, true);
mtx_color_option.unlock();
visualizer.GetRenderOption().point_size_ = 1;
visualizer.GetRenderOption().background_color_ = Eigen::Vector3d(1, 1, 1);
visualizer.GetRenderOption().show_coordinate_frame_ = true;
mtx_points_process.lock();
refush_process_points(pointcloud, points_pro.points);
visualizer.AddGeometry({ pointcloud });
visualizer.UpdateGeometry();
mtx_points_process.unlock();
visualizer.PollEvents();
visualizer.UpdateRender();

while (true)
{
visualizer.Run();
}
visualizer.DestroyVisualizerWindow();
return true;
}
体素滤波:
VoxelDownSample(double len);体素滤波函数是分装在open3d::geometry::PointCloud类里面的功能函数,可以通过该类型的点云数据对象直接调用。
bool voxel_filter(const vector<double>&pra, shared_ptr<open3d::geometry::PointCloud>pointcloud)
{
mtx_points_process.lock();
pointcloud = points_pro.points->VoxelDownSample(pra[0]);
mtx_points_process.unlock();
open3d::visualization::Visualizer visualizer;
mtx_color_option.lock();//该函数调用静态对象,线程不安全,加锁
visualizer.CreateVisualizerWindow("voxel_filter", 640, 480, 50, 50, true);
mtx_color_option.unlock();//该函数调用静态对象,线程不安全
visualizer.GetRenderOption().point_size_ = 1;
visualizer.GetRenderOption().background_color_ = Eigen::Vector3d(1, 1, 1);
visualizer.GetRenderOption().show_coordinate_frame_ = true;
visualizer.AddGeometry({ pointcloud });
visualizer.UpdateGeometry();
while (true)
{
mtx_points_process.lock();
if (points_pro.refush_p[4])//等待更新
{
points_pro.refush_p[4] = false;
pointcloud=points_pro.points->VoxelDownSample(points_pro.pra[0]);
visualizer.UpdateGeometry();//更新点云(滤波)
mtx_points_process.unlock();
}
mtx_points_process.unlock();
visualizer.UpdateGeometry();
visualizer.PollEvents();
visualizer.UpdateRender();
}
visualizer.DestroyVisualizerWindow();
return true;
}
补充:
1.静态点云可视化线程加入哈希映射,确保除了ROI操作,其余点云处理功能最多只需要一个线程来运行。
2.本小节简单介绍静态点云与功能处理,其效果与操作详见第四节。
四、整体ui界面功能与结果展示
软件环境配置:VS2017+open3d0.10.0+QT5.9.6
使用流程:
步骤1.点击查找设备,文本窗口会输出设备读取信息,如果读取失败,会报错误信息:包括未找到设备、设备获取失败等;
读取设备成功后,根据下拉框选取所需连接设备。
步骤2.点击打开设备,open3d_demo窗口会动态显示点云,点云可视化可以设置点云背景、大小、渲染方式。本次项目提供了X字段,Y字段,Z字段、法线、RGB_点云渲染方式。点击更新显示即可更新点云可视化显示。
此处展示X字段渲染效果:
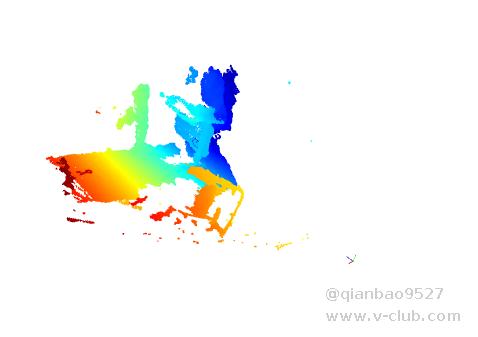
Z字段渲染效果:
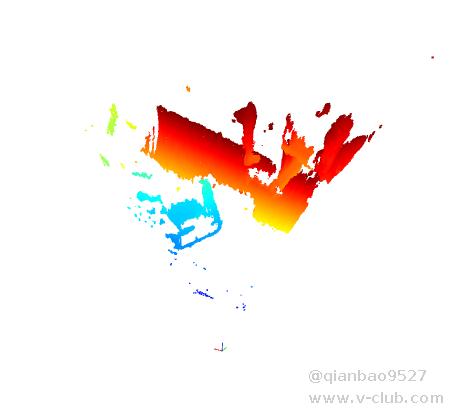
步骤3.点击静态点云可以获取实时显示点云窗口在这一刻的数据并在point_process里面显示。该操作可以重复进行来获取自己理想的点云数据。
步骤4.使用静态点云处理方法:点击对应的功能按钮即可,点云处理功能都能重复点击并更新窗口结果。
包围盒:可以设置包围盒颜色RGB(范围0-255)
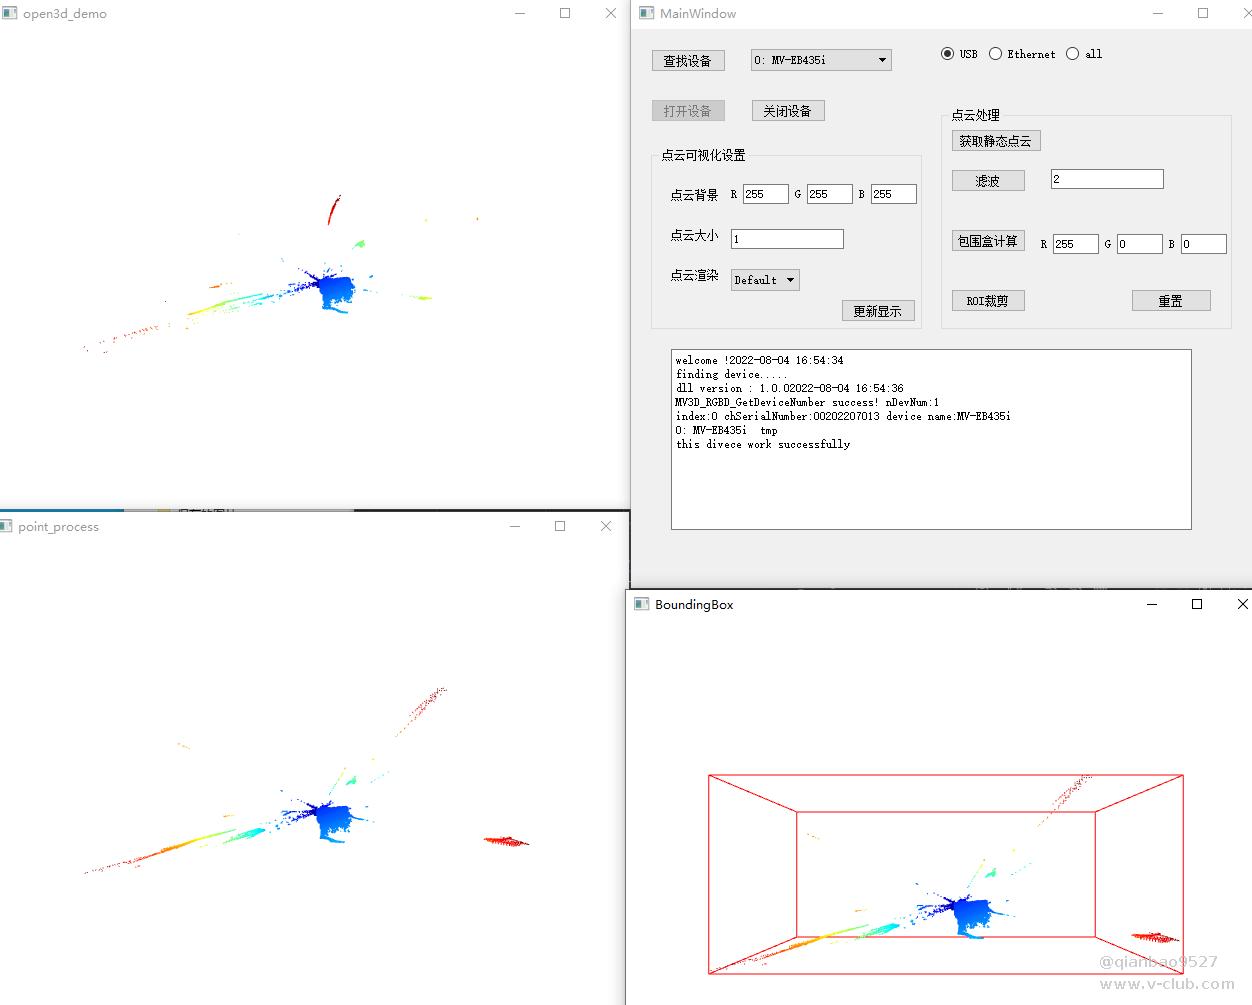
滤波:设置体素滤波的边长大小,来控制滤波效果。

ROI裁剪,在点击后,点击ROI屏幕
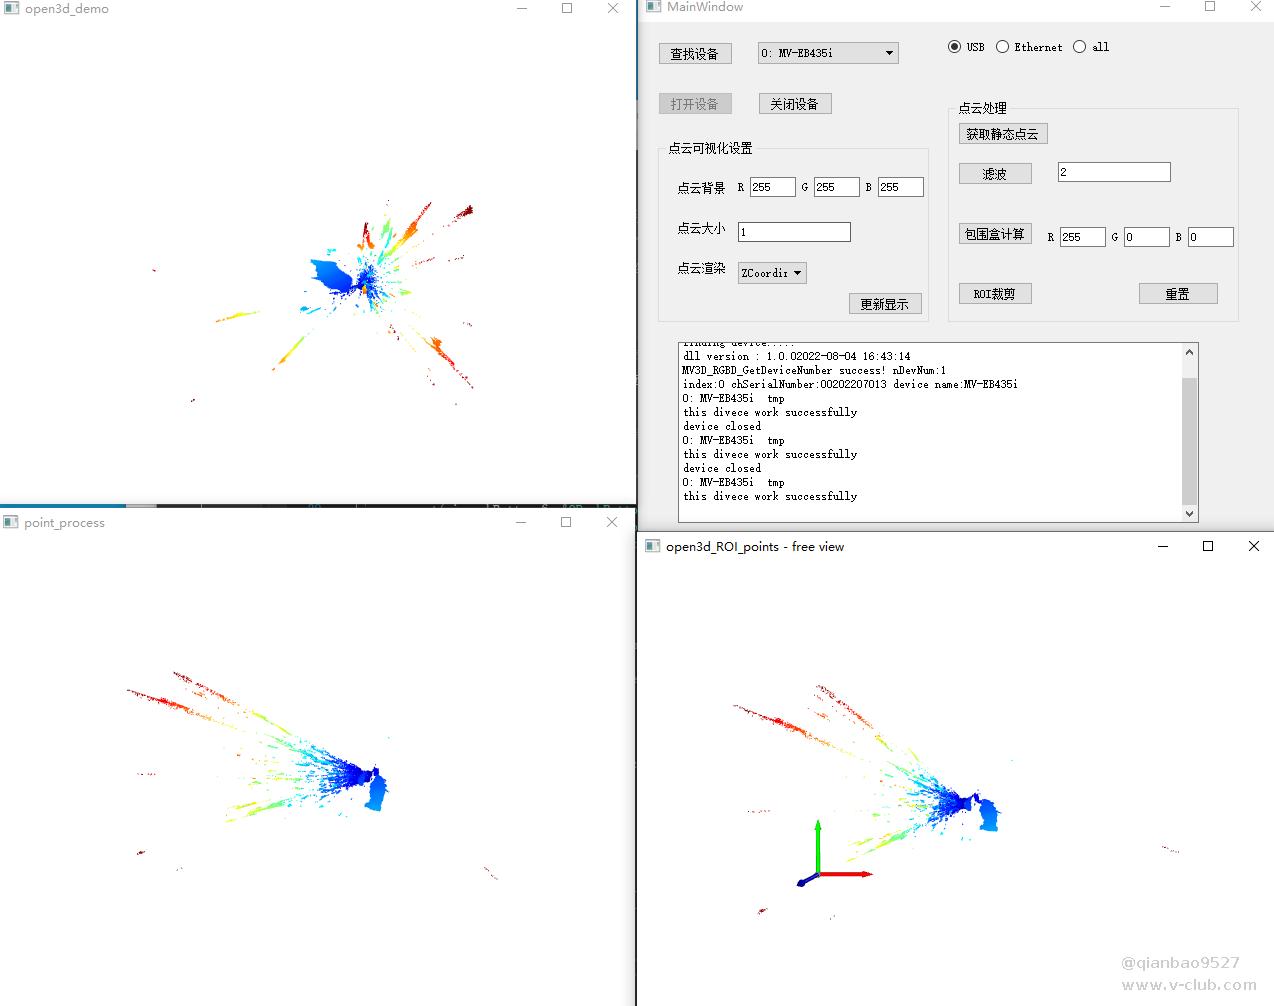
点击快捷键K,编辑界面,用鼠标左键点击选取区域
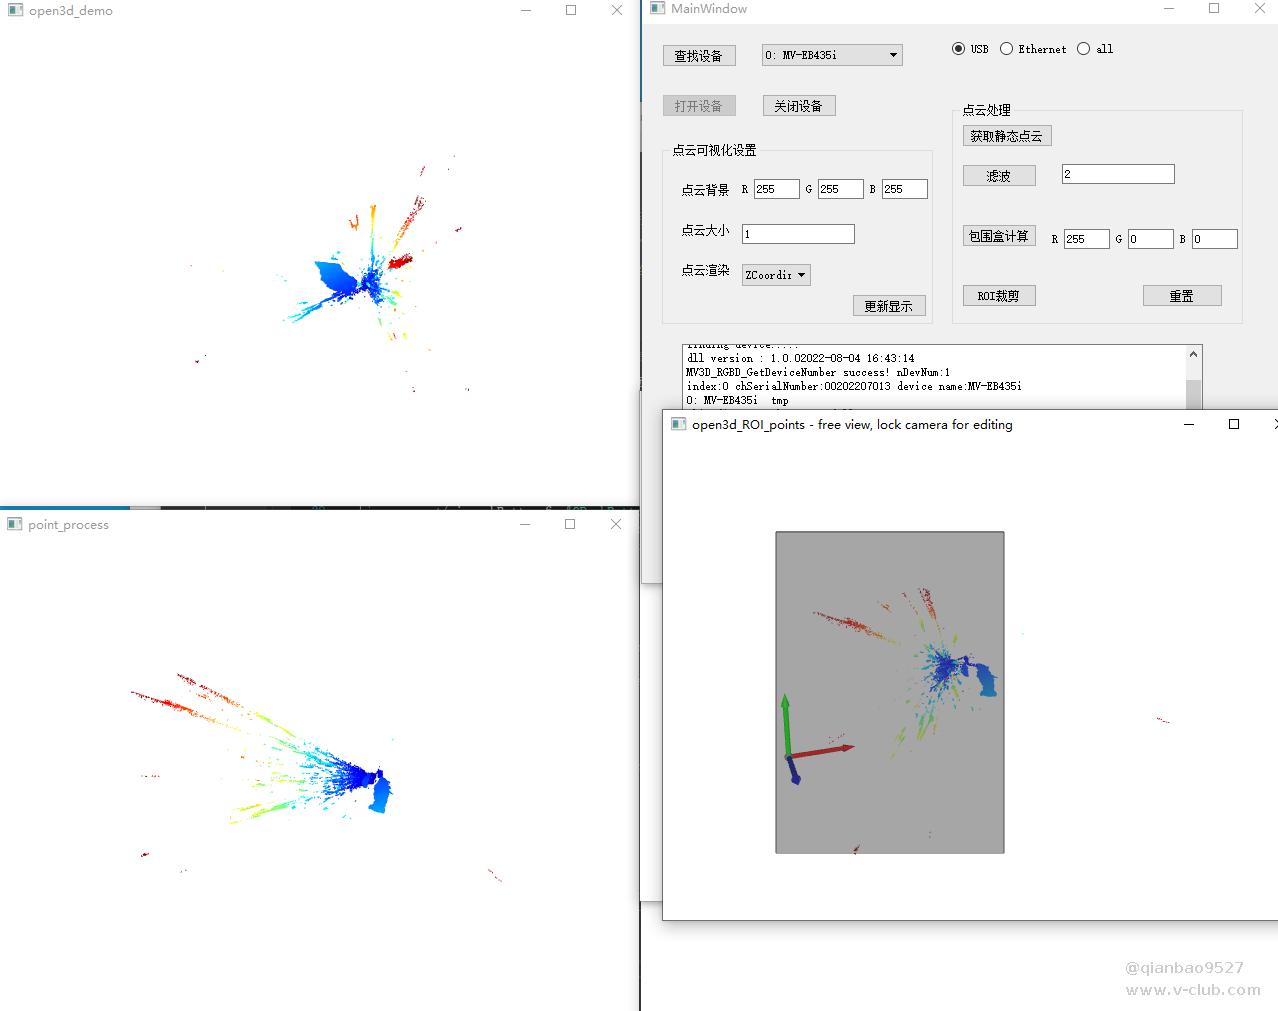
在框选出点云后,按C可以保留框选区域的点云,此时会弹出文件保存路径,保存的点云格式为二进制PLY格式。
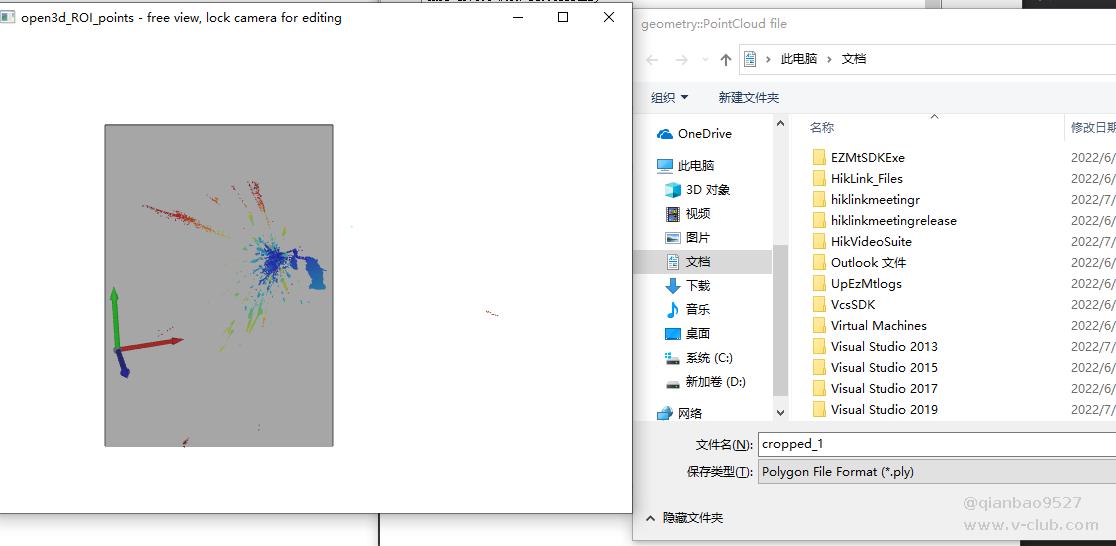
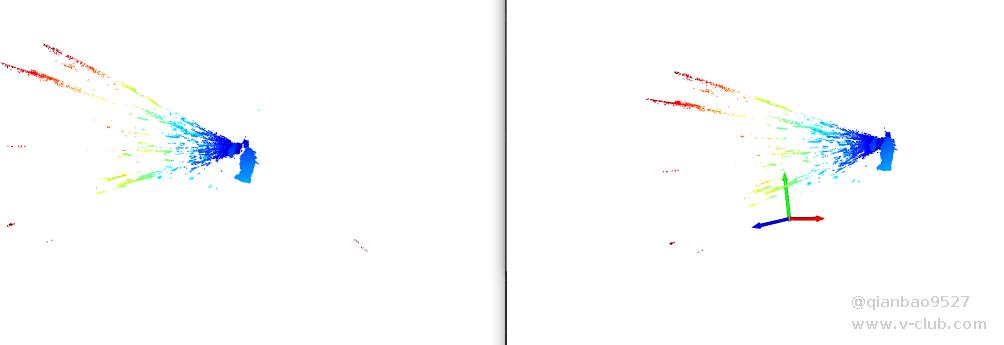
ROI裁剪后,有图为裁减保存后的结果:
步骤5.需要更换设备时,先点击关闭设备,再点击查找设备、重复第一步即可。
附说明:文章代码手机端如果显示不了,则需要PC端登陆才能查看。
open3d在可视化方面做的很不错,但版本之间差别很大,因为是还在更新完善的库,其环境支持以及功能接口相对还不完全,如果需要对点云进行可视化渲染,可以使用open3d;如果需要进行点云处理算法实现等,目前open3d在接口支持方面相对少一点,这也是不足的地方,希望后续新版本可以不断更新,提供更多底层算法接口。
代码链接:
https://github.com/qianbao9527/RGB_D-Camera-SDK-Open3d-project-demo





 浙公网安备 33010802013223号